
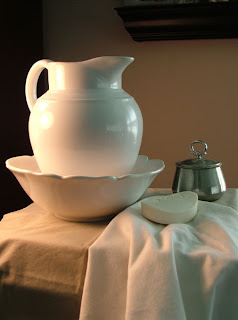
I've also been getting things ready for the workshop. We will be working from a photograph I made of a still-life. I usually work from photographs as I don't have a designated space to work on my art and therefore haven't anywhere to keep a still-life that won't get disturbed. The more I make my own reference photographs the more I learn though to the point that I enjoy both creating the reference photographs as much as drawing from them. I see it as part of the creative process and not a crutch if you make your own reference photographs.
So I thought I would share with you all some tips on making good still-life reference photographs. If you are going on the cruise you will be getting a print out of thi information!
Photographing a Still-life Some Tips!
First off, if you are going to be working from a photograph, it is important to have the best photograph you can. It is a tool, and you want to use the best tool that you can get!
For this still-life reference photo I used:
-Tripod
-Digital Camera
-Lamp - A lamp that can be directed or pointed as the primary strong light source.
-Window - Soft Light from a window for secondary light source
-Books to raise the still-life to the level needed for the lamp and window.
For this still-life reference photo I used:
-Tripod
-Digital Camera
-Lamp - A lamp that can be directed or pointed as the primary strong light source.
-Window - Soft Light from a window for secondary light source
-Books to raise the still-life to the level needed for the lamp and window.
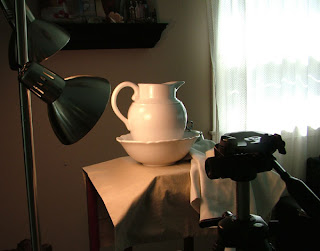
You don’t need a fancy set up or a box for your still-life. Just strip away the clutter behind the still-life.
I have neutral colored walls/furniture which is good for getting natural colors. If you don’t have neutral surroundings you can enclose the area with some neutral fabric. You should also wear neutral colored clothing.
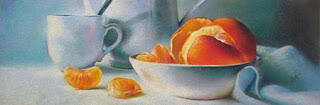
If you want a certain color to be reflected on the still-life, have different colored cloth at your disposal that you can hold near the still-life to get subtle colors reflecting. I use this technique to achieve desired color combinations. For example I used this technique when I had an all white backdrop and oranges as the subject. To get the oranges to pop, I wanted the white linen to have the orange’s complement reflected on the white linen, so I hung a piece of blue fabric near the still-life.
Take more photos than you think you can possibly use. I usually start with the arrangement or two I had in my mind before the photoshoot and then alter one thing at a time to get unexpected compositions. A good starting point is to put the main subject at the 1/3 mark going horizontally and moving things around from there. Use your viewfinder and move the camera up and down on the tripod to see it at different vantage points.
Take several photos of each arrangement before moving objects, as often the photos will be blurry.
To minimize photographic distortion from a wide angle lens (which is what most digital cameras come with) back up from the still-life and crop in later using a program like Adobe Photoshop Elements.
EDIT: I wanted to put a link to the type of light bulbs I use in my tree lamp for my still-life reference photographs. See 2 posts ahead. I use GE Reveal light bulbs because they are supposed to filter out the yellow light you get from most light bulbs. The other reason is they are cheap and fit into a regular lamp. I really like our tree lamp which I got at Target but I also have used clip on lamps from Home Depot before.
8 comments:
Thank you so much for sharing this information Nicole!
I'm not really "into" still-lifes but I've always liked yours, and even more so because you work from your own references. Maybe I'll be more inclined to try out a still life now that I know how to set one up properly! :D
OH wow - your info on taking pictures is great and comes in handy. I've worked from my own photos before, but never actually managed to get the picture I really wanted so had to make up for it later. I'll definitely give it a try again soon!
Take care,
Amira
That's really very useful nicole!. thanks for sharing your tips.
I know what you mean when u say cleaning the house:) I had been doing it all last month.
Goodluck on ur cruise I wish I could go too, do share your pics with us!
Thanks for the tips! I'll have to try a still life setup now. Do you know if those compact flourescent bulbs work well for this kind of thing?
Thanks everyone!
Meg I think those may change the colors too much. Here's the type that I used http://www.gelighting.com/na/home_lighting/products/reveal_main.htm
Thanks for posting this Nicole. I read this post thought it was great and stored it in my brain for later, then went grocery shopping and saw some fabulous pears which just begged for me to take their photo. So i bought them came home and took some shots using your tips!!! My shots wouldnt have been half as good otherwise :)Thanks again.
I'm SO happy it proved helpful Belinda!! I'd love to see what you did!
Just came across your blog while searching for info on still lifes. I'm just about to start some pastel work and I take my own photographs for reference too, but thought I'd set something up in the studio and your info about setting up the light sources is very helpful. Great information you provide here, thank you! Love your hanging fruit work. Enjoy your Alaskan cruise, we have friends (from NZ) currently on board one.
Post a Comment