Showing posts with label still life. Show all posts

Monday, August 12, 2013

Please Hang Up

Not titled - yet
12" x 36" 


I am starting a new series of still-lifes, larger scale than I have been doing. They will be 12" x 36" and possibly 24" x 30" depicting vintage items. This is the first of the series depicting an old rotary phone. 


Here it is in context leaning against my stairs and next to the phone in the picture. For most of the work I started each part with a midtone for that section and then added in the highlight, shadows, color tints,  and details on top of it. 


I thought I would also share some in progress shots as well. 


Monday, June 24, 2013

Pink Mixer

the Pink Mixer
8"x8"

I picked up this pink mixer at the Salvation Army in Keene before I left. I'd like to plan a larger "baking"still-life with it too. 

Tuesday, January 18, 2011

Still-life with Moo-cow


I bought this cow creamer a while ago, but had trouble fitting its long shape into a still-life. Putting the tipped over cup behind it offered the composition a similar shape which I think makes it work. That same cup with the spoon sticking out of it plus the curving and waving fabric added a lot of movement to the composition which was a lot of fun. That movement almost animates the rest of the objects, which makes it seem like the cow creamer is threatening to walk out of the composition. Which makes me think... if personification is "the attribution of a personal nature or character to inanimate objects" then is this animalification?

I  tried something of a new technique on the background. Since I was using a grey board and I wanted a grey background, I laid down a colored pencil the same color as the board: Dove Grey Coloursoft. This gave me a smooth texture to smudge other greys into by first scribbling them on, then swirling them around with a 1/2 inch bristle brush. I like the effect and it took less time than usual. 

Sorry for the blurry photographs (like usual) and you can click on them to see it larger. 

Monday, November 8, 2010

Good Luck

Good Luck
12" x 12"
Coloursofts and Prismas on Fisher 400 paper

I just finished my Good Luck still-life. I should have photographed it before I varnished it as it glares all over it. It still needs to be mounted then I'll bring it in to the gallery.

Friday, September 24, 2010

Nopales

Cactus Salsa

In November I am going to be part of an exhibition at Mission Trails Regional Park in San Diego California along with my online critique group: Louise Sackett, Katherine Tyrrell, Gayle Mason, and Vivien Blackburn. 

The show is supposed to reflect the wildlife in the park. Here's a snippet from the Mission Trails website:

Mission Trails Regional Park encompasses nearly 5,800 acres of both natural and developed recreational acres. Its rugged hills, valleys and open areas represent a San Diego prior to the landing of Cabrillo in San Diego Bay in 1542. 

It has been tough for the group to come up with subject matter for the show as all but Louise lives far from the area. I live in New Hampshire, on the east coast, which seems mighty far away, but Katherine, Vivien and Gayle live even further away in England, so I am not going to complain. 

On the Mission Trails website they have listings of pretty much all the plants that live in the park. One was the prickly pear cactus (the one and only cactus in the park) which I am very grateful for! So when I went back home to Illinois this summer I visited a Mexican grocer and got myself some prickly pear cactus! I know... show in California, I live in New Hampshire and I picked up the subject in Illinois... at a grocery store. Well you do what you have to do!

So to end an unnecessarily long story, my cactus has been getting browner and browner in the fridge so I had to do this piece now! Its a collection of ingredients for Nopales Salsa

I'll be doing a couple of more pieces for the show soon... thanks to my stepsister Lisa who lives in San Diego and who sent me a bunch of goodies she and her son picked up for me! 


Saturday, July 10, 2010

Bird's Eye View

Bird's Eye View
8" x 10"
Prismacolors and Solvent on Fisher 400 paper

I need to go in and touch some things up on this but I am impatient to post it. 

My daughter and I picked these lovely flowers on the side of the road. I think I need to go back and just get a whole vase full of the black-eyed Susans! They were really fun to do.

Tuesday, July 6, 2010

A Fish Out of Water

A Fish Out of Water
8" x 10"
Prismacolors of Fisher 400 paper

I could do loads of these... I am such a fan of kitsch! 

Thursday, July 1, 2010

A Walk in the Woods
10" x 8"
Prismacolors on Pastelbord

We have been enjoying loads of wild raspberries from our backyard. We've had raspberry muffins, pancakes and they are great in my greek yogurt with some walnuts. So this little still-life is just some things I found in the woods behind my house and stuffed in a little metal green teapot. 

Sorry for the lousy photo.. it was late and I only had artificial lighting. The photo below is interesting though. The butterfly still-life on the left is under Museum glass and there is no glare and the orchid one next to it which is on Pastelbord and has been varnished has a terrible glare! The Walk in the Woods has not been varnished yet so again no glare there. 

I hope to drop these 3 off to the gallery tomorrow along with some portraits. That is if I can get them framed! They are just sitting in the frames right now. 

Thursday, June 24, 2010

Oriental Flair

Orchids
         6" x 10"
Prismacolors of Fisher 400 paper mounted to Gatorboard

I'm kind of hooked on this 6" x 10" shape. Its kind of funny because this shape is just the leftover piece from the board I had Creative Encounters cut & mount off of my sheets of Fisher 400 paper. I just like that little bit of extra height to cure that perfect rectangle feel of an 8 x 10. 


I am also stuck for a little bit on the tiny details after doing these! I better do a bigger one next to get me out of it for a bit - but I have 2 more 6 x 10's left!
Here's a pic of the three small ones sitting on (a very dusty) ledge together. Seeing this I may darken Maggie's figure  on the first one. 

Wednesday, June 2, 2010

Weird Purple Flowers

Oh you don't want to know how busy I've been lately, so I won't bore you. I'll just say I brought my studio home so I can sneak in more work here and there.

Here's the newest, some strange purple flowers from Lina's house. I don't know what they are. :-)

The framing on this one will be difficult to get the illusion right so I will be taking it to the framer instead of doing it myself. I have a couple of others I need to frame too.

Thursday, January 28, 2010

Traditional Lemons


I just finished a more traditonal looking lemon still-life. Its 12 x 12 - which I guess is not a traditional format. I placed the glass almost dead center and flanked it with lemons. Click on it to see it bigger.

I've been spending a lot of mental energy on trying to figure out what to do as a sequel to my Zen piece. Search my blog for the word Zen if you are not familiar with it. I've come up with some good ideas I think... but will not know for sure until I sit down with the model - hopefully this weekend I can do that. I did get some really bad ideas pop into my head too... like having her lean over in the same pose but instead of a stack of rocks in front of her, place a very tall sandwich or scoops of leaning icecream. See I said it was bad! I did have a couple of good ones however and hopefully I can work with my model soon.


Friday, October 30, 2009

Well my little flu case is feeling pretty good today... but the school doesn't allow kids to come back to school the day after they get sent home with a fever. With all the flu going around it is a good rule, but bored little 6 year olds who are missing their Halloween party at school are not that fun to be around!

But look! I got it finished except for sealing it first with a colorless blender and varnishing.
I am also trying to decide if I should erase some of the background and add another lantern on the left side? Take a look at the next picture and see where I copied and pasted an extra lantern... it wouldn' be an exact copy like that but it just shows that space filled. Should I? Maybe it looks better without the arrangement perfect like in the first photo?


& I wanted to talk a little more about the composition. It had a little problem from the start since the chinese lanterns are so tall and the other objects are so much lower. At first actually I had some artificial lanterns from the client... but those proved to be way too tall when I got back to the studio and looked at the photos I took at the client's house, so I went out and got some real ones. Much better fit then... and I just had to move a couple lanterns when I drew it and delete one and it was a good arrangement... nature somehow usually works!
The lanterns are still pretty tall though... and the other objects pretty short. So to fit it all and stick around the size the client originally asked for, I had to put the whole arrangement lower on the board than I usually do. It doesn't look great, until you put on a faux frame which visually lengthens the bottom of the composition. :-)


Thursday, October 29, 2009

Back to Autumn and portrait commission finished


Remember I said that the autumn still-life was put on hold? Well there was a little misunderstanding in the initial instructions which is a little humorous. I was told it should have some gourds, a jack-o-lantern in a white pitcher, a pumpkin, some chinese lanterns and maybe flowers. Well I did think the jack-o-lantern in a vase was a little odd... and soon found out it was supposed to be chinese lanterns in a pitcher! Too funny. I do like some of the compositions I came up with with a pumpkin in the pitcher though!

Anyway, the client lent me her majolica pitcher for the chinese lanterns and here is where I'm at. Actually I got a little further than this today but didn't take another photo.


& I have some good newsand some bad news... I am going to be able to work on this tomorrow and tentatively finish it... the bad news - I have the time towork on it tomorrow because my six year old has the flu and I can't go to work because I will be home with her. So I brought home my supplies and while she's vegging on the couch, I'll hopefully have this finished.
Below is my portrait tromp l'oeil comission. Its finished except for the okay from the client. Enjoy!

Wednesday, October 21, 2009

Update and pumpkins

Here is an update on the portrait commission. I think I owe it an explanation. The client had his and his wife's school photos from 2nd grade.. and asked if I cold draw him pushing her on a swing or something. It wasn't really possible with the little frontal view school portraits so I said no... but I could make a tromp l'oiel with the school photos on a desk with some kid stuff along with them. I asked him what he and his wife were into as kids and incorporated them on the table. I kept the 70's feel of the faded photographs and added a harvest gold tabletop.
The result: one wacky looking non-traditional portrait! I love it... but I have a very warped sense of humour. My favorite part is where the lines above the bee logo match up with the kick lines from snoopy. :-) Oh and the glue heart... who wouldn't like that?
There's loads to do still... and right before I left the studio today I messed up her poor little chin! It will be fixed tomorrow.
I have so much less time lately that while I was waiting for my paper to be mounted to a board by Creative Encounters, I started one of the compositions from that autumn movie I posted.


Tuesday, September 15, 2009


This one turned out to be a little bigger than the blueberries... at 12 inches wide. I did it again with Prismacolors on Fisher 400 paper.

Someone asked me about using Prismacolors again when I've said in the past that they were not my favorite pencils. Like all the pencil brands every brand has pros and cons. Pros for Prismas I would say are the many colors (especially the new colors they added), and the durability of them (meaning they don't smudge). There are loads of things I don't like about them - the wax build up, wax bloom, and the way the push you to be really detailed.

Anyway... instead of telling you what I changed from the reference I took in the last post, I'll let you all tell me! :-)

Wednesday, September 9, 2009

two ways to pluck a chicken

I've always liked still-life because they don't require anything that you can't obtain (especially with the help of Ebay). Unless of course you add something like a landscape behind it like in my Monadnock Berries piece two posts ago. That one I got lucky with. I went blueberry picking with my kids and in the little house you pay at at the farm, they have a balcony overlooking the fields and Mt. Monadnock. I plunked my blueberries and leaves right on that railing, squat down to get the right vantage point, and took several photos. When I went through the photos when I got home, one was perfect for drawing (the one that didn't have Christmas lights in the view).

Now I want to do several more still-lifes with landscapes behind and the berry place I believe is closed for the season. Plus I don't know if they would like me to bring other fruits to photograph on their railing... and I'd like not every one to have Mt. Monadnock behind it.

So this time I bought some raspberries and I believe blackberries from the grocery store, went in the backyard and picked some dying raspberry plant leaves and set up a little still-life on my deck. The view however from my deck isn't so good... the tall trees are just too close. I decided to take some landscape photos for the background, but quickly learned that what worked with the Monadnock Berries was that the landscape was from a high vantage point so I could see the soft blue mountains. So, instead of planning a day hike up a mountain, I went to Flickr and looked up NH hills in the Creative Commons.

Creative Commons provides copyright free or limited copyright of images by normal everyday photographers. Since my composition is just using a portion of the cc photograph, cropped and with other things added, it falls under the guidelines for most creative commons copyright photos.


Original Creative Commons Photograph which happens to be an anonymous photo taken in the 1950's.

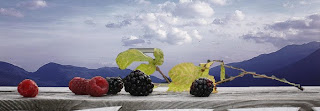
& here is the photo reference I will use adding my grocery store raspberries in the foreground. I used Photoshop Elements to add the pictures together very roughly since the drawing will correct any problems. Notice how the original photo looks completely different from the end reference photo?

Now today, as it is my birthday, I thought I would go to Alyson's Orchard since it is high up on a hill and gets just the types of views I like for the background. So I trudged around the orchard and picked the two types of apples available right now complete with leaves, and looked for places to set up a still-life with an instant backdrop like at Monadnock Berries. I brought a piece of wood to set the apples on and placed it on a pole in the ground. Crouched down looking through the viewfinder until I got the correct vantage and snap! no photoshop necessary!

the finished reference photo.
here's the post I set up the still-life on.

Either process works and probably a trip to the farm and going to the grocery store, picking leaves from the backyard, and photoshopping - both probably take the same amount of time. I prefer taking the reference shot on location and not piecing it together, because the lighting always works for the two together and the camera creates some of the soft edges between the foreground elements and background that a pieced photoshopped image won't have. Plus it just seems more authentic.

Tuesday, September 1, 2009

Wow, I can't believe I'm making a post and I can't believe I was in my studio today. I haven't been there since the beginning of July, but I wouldn't trade the summer with my kids for anything. They are back in school now and I have started my new adventure teaching art to preschool - 8th grade at St. Joseph's Regional School here in Keene on Mondays and Fridays. The kids are loads of fun... I hope I can provide them with enough inspiring projects throughout the year. Thanks so much for the responses to my question in the last post - they were very helpful.

The plan for the year is to be in the studio all day on Tuesday, Wednesday and Thursday.

So here's what I did today! on Tuesday! :-)


Its small - about 6" x 12' prismacolors on Fisher 400. I think I'll call it "Monadnock Berries" after the place I picked the berries in Troy, NH and where I took the pretty view of Mt. Monadnock.

I'm going to bring it right over for framing so it can go in my show at the Monadnock Fine Art Gallery (opening night is September 25th). Actually I hope to get a few more still-lifes finished for the show to add to the 15 they already have.

I've got some news to share from this summer. My piece Zen won Best of Show in Ann Kullberg's annual FMP show! :-)

& it also was a finalist in the Artist's Magazine Competition.


Hey & check out Karin Jurick's new painting challenge! It's cupcakes!! I'm so excited - I may even do it this time! http://differentstrokesfromdifferentfolks.blogspot.com/2009/08/week-46-48-challenge-cupcakes.html

Monday, June 22, 2009

& the Dish Ran Away with the Spoon


& the Dish Ran Away with the Spoon
well that's the title anyway. :-)

This was a lot of fun... albeit time consuming for such a small piece. There is so much going on in that little square. I almost think it doesn't work, its so busy... but hopefully I managed to pull it together by lumping values together (sort of like Hopper did) and simplifying where needed. I think you can see what I mean more in the .jpg below where I used the cutout function in Photoshop Elements to lump the major value shapes in the piece. I used the shadow down the center of the cloth as a dark shape leading the eye up and framing around the coffee cup... which actually mimics that long black shape in Hopper's Chop Suey picture on the table.

One of the most fun things about this was getting to know Hopper's painting better. He used objects, color shapes etc pointing this way and that all over the picture, which I tried to mimic in my drawing. Other things I mimicked was the writing on the cup with the sign in the painting, and the resting areas of the white of the table. I'm sure there's more - and you can let me know!

I had to change the Hopper painting a little. The Chop Suey painting has two focal points - the women in front and the couple in the back... well when you add my focal point of the coffee cup and spoon - that's just way too many focal points... so I decided to fade in the couple in the back of the Hopper painting instead of having them stand out... the same thing for the big yellow square next to the girls on the right... I just made it stand out a little less to keep the focus on the girls.

& I just got back from getting a nifty matt cut around the corner at Creative Encounters so when it is at the Silent Auction (during the CPSA Convention) it will look nice and tidy. They helped me pick a matt and showed me this green core black matt... which seemed to work. It didn't occur to me until I got back from the studio how the green core really made the green lines on the cup and saucer really work!


Wednesday is the last day of school for the kids which means my studio will stay mostly empty for a while. If anyone want to see/reach me just email me and I can come in. As far as blog posts go... they will be fewer and farther in between probably for the summer and may include more sketches (from our trip to Maui we are taking in July), but don't worry I'll be back in full force in the fall for sure... and will be here. If you haven't subscribed or "followed" me yet nows the time to signup so you won't miss when I start posting more again.

Wednesday, May 20, 2009

Pear Halves


Here it is finished. Pear Halves, 8" x 10" Luminance & Coloursofts on Grey Pastelbord

I say finished but I really really want to try using a heat gun on it. I saw an article about this technique in Ann Kullberg's e-zine and I think it might just work on the Pastelbord to help fill in the dots... or it may make a huge mess. The point would be for the heat gun to heat up the wax based pencil and let them melt just a bit. Hmmmmm you may see this again or I may chicken out!

& I have to show off my new little drafting table (below) that I got for $20 at the Creative Encounter's Frame Shop basement sale! Yay! (Love that place and all the women who work there!). Its short so I've gotten an exercise ball for a chair... which certainly gave me some exercise blowing it up with the little hand pump that came with it. The hand pump is staying in the studio - it works great for clearing the shavings off my work!

Thursday, May 7, 2009

pears finished


Finished. I wish I would have done it on a darker board, because the little light tan specks are showing a bit too much.